Nativity quilt #2 is finished, and the instructions are nearly done. Christmas week is not the best time for this task! However, I've already received some orders even though I've not decided the price.
I've a question. One person asked if the pattern could be sent digitally. I thought about that and wanted to try it. Since the pattern is about 30 x 60" my biggest concern is whether it could be printed full size from a .pdf file. Happily, it can. It takes about 20 letter-size sheets of paper. Each sheet has registration marks so they can be easily lined up to trace every pattern piece on fusible.
Staples will print the pattern that big, but if I mail paper patterns, it adds that printing to the cost, as well as the postage. (Printing a pattern that size is about $5 CD) This might be the best for those who don't want to print it out themselves, but more expensive in the total price.
The other drawback of digital is that I have less assurance about my copyright being honored. Once the file is out there, unscrupulous people could easily give it to others or re-sell it. I know that most quilters are honest folk, but it could happen.
Any thoughts and suggestions about digital patterns would be appreciated. If you don't want to make a public comment, email me privately. epm dot mail dot 444 at gmail dot com. Thanks for whatever advice offered!
Wednesday, December 30, 2015
Thursday, December 24, 2015

Wednesday, December 23, 2015
White Christmas
We are going to have a white Christmas. It is softly snowing, quiet and simply beautiful outside. I could have walked to the wildlife park and taken a few outstanding shots instead of these from my steps, but I'd rather be quilting.


Actually, I'm working on the Nativity pattern and found a way to make it digital so that anyone who wants it that way can save postage and pattern costs by printing it on their own printer using Adobe Reader. This is an exciting discovery. Getting the directions perfectly clear for making the quilt takes time though. I will also include directions on how to print it!


Actually, I'm working on the Nativity pattern and found a way to make it digital so that anyone who wants it that way can save postage and pattern costs by printing it on their own printer using Adobe Reader. This is an exciting discovery. Getting the directions perfectly clear for making the quilt takes time though. I will also include directions on how to print it!
Thursday, December 17, 2015
"You Shall Call His Name Jesus"
This 'sample' is finally finished, well almost...

The label is made, ready to sew in place. Everything else is done except writing out instructions for the pattern, and getting the pattern printed and into envelopes ready to mail. I've not set a price for the pattern, but have had a few orders from people who have not seen the quilt!
But it is only a week until Christmas and there are many other things to do. So for the next week, enjoy decorating, shopping, wrapping, singing, baking, visiting with family and friends, and all the delights of Christmas!
Friday, December 4, 2015
Nativity 2, nearly finished!
This quilt is now sandwiched and quilted. The binding is ready to sew on, and I will likely do it front to back by machine and hand stitching on the back. It is a nice way to relax. The hanging sleeve is also ready to put on, again by hand and maybe during a hockey game on television.

At this angle, there is distortion... Mary's hand looks huge and Joseph's face looks too small. Not so!
These pieces are fused, but needed to be stitched. I was dreading it and didn't want to stuff it into my DM so loaded it on the longarm. I bought a few shades of Invisafil and am pleased with the results. It is like sewing with hair, and required 0 tension on the top. I also put it in the bobbin. I used a size 12 needle, against the strong warning of my Avante dealer who thought such a small needle would break. I had no problems with it, even through backing, batting, and a top with fused layers. That size still left 'holes' but not nearly as obvious as the size 14 needles.

My stitching isn't perfect, yet at a short distance, it is invisible. Had I spent more money, I might have been able to match the colors better, but it is really hard to tell which color works best on each fabric. Pale blue disappeared on blue, but black also disappeared on dark green. As the "Dear Jane" quilters say, finished is better than perfect.
I will be offering the pattern for this as soon as I get it written. I've come up with a way to do it with transparencies, so am now looking for a bargain in the ones used on copy machines.
Saturday, November 21, 2015
Dancing Animals
This is another panel which gives opportunity to practice quilting, but the main purpose is to take it to our local (and wonderful) children's hospital.

I have the top done of the Nativity quilt and will put borders on it before quilting, just 2-3" of black to set off the colored 'glass' part. I've black batting, thread, and no more excuses. Pictures later.

I have the top done of the Nativity quilt and will put borders on it before quilting, just 2-3" of black to set off the colored 'glass' part. I've black batting, thread, and no more excuses. Pictures later.
Wednesday, November 11, 2015
Progress on Nativity
 Life keeps pounding away making time to quilt a serious issue, but there is some progress on this nativity quilt. Here is part of Joseph. The color in the photo isn't perfectly accurate, but it does show the super fabric I found in my stash for his beard! Next is the Baby Jesus and straw for His bed, then it will be ready to quilt.
I've come up with fresh ideas for the pattern for this one and am hoping to have it ready soon.
This Saturday, I'm involved in a Quilts of Valour (Canada) Sewing for Soldiers day. From 9-5 about 32 of us will be making quilt tops for veterans and wounded soldiers. It is a labor of love and thanksgiving for all they have done.
Thursday, October 29, 2015
A little progress . . .
Life has been hectic for us the past few weeks. My hubby was called to fly to a job site two times, staying for 3-5 days each. We had several deaths, young and up to 96. I put two items on Kijiji and got over twenty calls in one day. Never mind the normal stuff like quilt guild meetings, a quilt show, hair cut appointment, voting, medical appointment, day of prayer, and stuff like laundry and house cleaning.
However, this quilt keeps calling me to add more pieces. I was worried about this face but am happy with it. I may do some shading on it, haven't decided. This picture shows less than half. Joseph and the baby Jesus are still to be done.

I've learned a few things on this one, so when it is done and the pattern is ready, it will have a few new tips for making it with less stress than it looks!
Wednesday, October 14, 2015
Nativity Two - Progress
Canadian Thanksgiving was lovely and leftover turkey means less time in the kitchen and more time in the studio! Here is the progress on the Nativity Quilt...
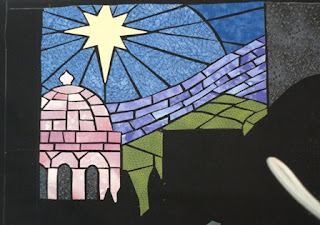

The first one is the left side, the other on the right. I'm hoping not to buy any fabric. Some of the pieces are tiny, but fused down and will be stitched. It is sort of like putting together a jigsaw puzzle. Fun.


The first one is the left side, the other on the right. I'm hoping not to buy any fabric. Some of the pieces are tiny, but fused down and will be stitched. It is sort of like putting together a jigsaw puzzle. Fun.
Saturday, October 10, 2015
Baby, One-Block Wonder, and a new Nativity
Last Sunday we went to a nearby forested area and I took a few pictures. I left my camera in hubby's car and he left Monday for a project in Portland, so my camera sat in a parking lot all week. That is my excuse for being a tad late with a post. But I am inspired by the roots of this tree, and the invitation to walk in those fallen leaves...


First an easy finish. I pulled a panel out of a drawer for some practice on the longarm. It is a cute "cheater" quilt and will find a home soon.

Second, that one-block challenge with all seams on the bias still hangs on the wall. Here is a glimpse of parts of it. I had hubby pick up the backing for it in Portland, thanks to the "order online and pickup in store" policy at Fabric Depot (love that store). I've got a few ideas how to quilt it, and also bought some blue crystals, at the suggestion of a friend.


Third, I'm at it again with a new Nativity quilt. This one is the results of so many requests for the pattern for this one. As you can see, it is just in the beginning stages, and is fussy work, but I love the color contrasts. This is part of the top of the design. More pictures later as it progresses.

Also making plans for November 14, a Saturday. I'm working with the Canadian Quilts of Valour group to host a 'sewing for soldiers' day using the large foyer at our church. We will be making tops only, so no quilting experience is necessary. People will bring their machines, some thread, and be prepared to cut, sew, press, and have fun. If anyone lives in Edmonton, AB and wants to come, post a comment with your email so I can send you more info. This isn't on their website yet, but hopefully soon. It is an amazing way to say thank you to our wounded military men and women, and to our veterans.
Saturday, September 26, 2015
Progress on One Block Wonder
This mass of triangles is finally sewn together. It needs a final press before I load it on the Avante and stitch in many ditches to stabilize it. Every seam is on the bias!

I've no idea what to do after that, so if anyone has suggestions??? One of my friends won a ribbon at our last guild show, but I don't remember how she quilted it. Guess I need to give her a call.
By the way, this is two colorways of the same print. I'm left with enough to put a few bits in the backing and it will be all used up.
Thursday, September 10, 2015
Progress and One-Block Wonder
Life has a way of tossing curves and blowing up plans, but I'm still getting a few things done. The last "leftovers" quilt has been quilted and I'm now stitching down the facing. I tried a new (for me) way to put on the hanging sleeve by sewing the top edge of it by machine on to the top facing. The sleeve was hemmed on the ends, but not the long edge. That was done after it was sewn on the facing. Then the facing was pinned and stitched by hand to the back, and I will hand stitch the bottom of the sleeve when I get the other facing pieces done. It is looking okay, but I'm still thinking of it as a 'practice quilting' quilt. Pictures in a few days.
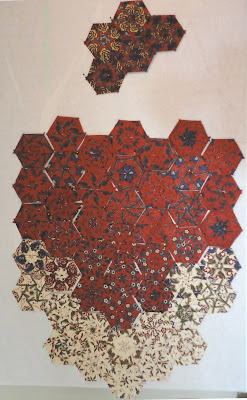
This one is on my design wall... a one-block wonder from a print in two color ways. Most of the darker blocks are just randomly placed as I sew them. There are dozens left to stitch, so this one will take a while to finish and sew together.
I wasn't too sure about the overall layout, so made a few hexies in CorelDraw and moved them around, finally deciding that tall and narrow with the lighter fabric at the bottom looked the best. Now that I see this picture, I like it, but need to rearrange some of those blocks. Deciding how to quilt it is going to be a challenge!
Tuesday, August 25, 2015
Progress Report for August
This is the first quilt... done awhile ago... "K-5"

And this is the one from the leftover strata ... It is about 72" square

I was going to do this... which is pretty...

But decided instead to do this... which goes with the decor in our loft...

Busy? Yup. One more being pieced, one more being quilted ...
Wednesday, August 12, 2015
Flying Geese and Half-Square Triangles
Those quilts with a zillion small pieces sewn into 'flying geese' or 'half-square triangle' can be intimidating. Not only that, when the pattern asks for triple-digit quantities of them, I just moan. However, there are a few tricks...
This week I've rediscovered one in which you can make 4 flying geese at the same time. The first set of directions I found used 5" charm squares, but another author suggests 5 1/4." She gives full instructions, pictures, and the formula for different sizes. Here is a link that includes this method, plus three others, with charts to show how big to cut the pieces. Flying Geese Methods
As for the HST method, it makes 8, yes 8 of them at one shot. It works really well and I've not seen this one before (mainly because I never looked until falling in love with a pattern that needs a zillion of them).
In this method, the instructor uses a special ruler to draw the sewing lines, which is totally unnecessary. Just draw each line corner to opposite corner and sew 1/4" on either side of it. No need for that ruler/gadget.
Other videos and instructions give variations, like pressing seams open (don't like it because you can see the seam through the light triangle fabric). One has a different formula for the size of the square you need, and had I used it, mine would have been too small. The formula should be "finished size of HST x 2, plus 2" and this gives very little to trim off. So if you want a 2" finished HST, use two squares that measure: 2 x 2 = 4, plus 2" = 6". The link to the free video (at least it is free right now) HST - 8 at a time.

I've not cut the 4" centers yet, but this is my first stab at what I might do with them, an old familiar design, but there are many variations . . .
Tuesday, August 4, 2015
Leftovers again
Several months ago I made a quilt from greenish strips of scraps and gave it to Quilts of Valour. The leftovers were fairly large so decided to make another 'leftover' quilt. This one went through several design tries before I settled on the last one... which is still not completely sewn together, just the bottom part. I didn't have much of the dark green (background is darker than the picture), but there is enough to add a few inches of border after these pieces are sewn together.
Okay, so I'm Scottish, and it feels good to use these leftovers. The cost of some background material and backing isn't too outrageous, so my penny-pinching tendencies are very happy.

Figuring out how to sew it together happened while I was taking a prayer walk and thinking about something else entirely. Funny how that happens. Hoping that the quilt design will be the same sort of 'gift' as right now, I've no clue how to quilt it.
Okay, so I'm Scottish, and it feels good to use these leftovers. The cost of some background material and backing isn't too outrageous, so my penny-pinching tendencies are very happy.
 |
| Didn't like the hole in the middle |
 | |||
| Okay, just turned it 90 degrees |

Figuring out how to sew it together happened while I was taking a prayer walk and thinking about something else entirely. Funny how that happens. Hoping that the quilt design will be the same sort of 'gift' as right now, I've no clue how to quilt it.
Thursday, July 23, 2015
Another one made from leftovers
This one needs a label and a name. One of my kaleidoscope quilts had several pieces of strata leftover. I didn't want to throw them away so bought some background and backing to go with it. This one is 72" square.


My design wall is otherwise occupied so took this picture with the quilt tossed across the bed. The close-up shows the texture in the background created by my first panto design. It was a challenge to quilt, but the result suits the bits and pieces. See K-5 HERE.


My design wall is otherwise occupied so took this picture with the quilt tossed across the bed. The close-up shows the texture in the background created by my first panto design. It was a challenge to quilt, but the result suits the bits and pieces. See K-5 HERE.
Friday, July 10, 2015
Problem solved, but not without pain
That panto with the straight lines did manage to get stitched on my quilt. I could not find any solutions (other than buy the software) so tried to watch the laser and stitch it with a ruler. If the panto had been wider than 6" and my machine arm longer than 18" and my body any shorter than 5'4", it would not have worked. As it was, parts required standing on my toes.
Here are the photos. I finished it yesterday and today started applying a facing to finish the edges. I'll post more pictures later.


The pain? My attention wandered as I worked, and while it did, my machine decided to take a bite out of my hand. Sorry, no gross photos. The goose egg went down in a few hours and the black and blue showed up the next day. No blood, but the part that hit me (micro handles) did break the skin. No griping. It was worth it... I think.
Thursday, July 2, 2015
A question?
I've a modern quilt loaded on my longarm and was going to do a quilting panto with lots of straight lines. I designed this one myself and do not have the software for the machine to just do it for me. The photo shows two rows.

I tried a few inches and had to unsew it because what seemed straight with the laser was impossible wavy. It looked awful and I had to pick it out.
Having never marked a quilt already on the machine, does anyone have any tips? I've made a stencil and could use chalk, then quilt it with a ruler, but this could take forever. Is there any way to do this that will not give me a headache and a sore back?
I could change the quilt pattern, but it is perfect for the quilt... and maybe I'm just a little proud of myself for coming up with it? Sigh!
Wednesday, June 24, 2015
With Scottish blood in my veins, I cannot throw away parts and pieces. The last post, Modern Towers, was made up of leftovers from another quilt. It was so satisfying, so I'm trying another. This time the leftovers are from K-5, a kaleidoscope using Ricky Tim's method. (Click on K-5 to see it.) You make strata and cut out mirror-image pieces. It is great fun, but leaves many triangles of strata. I sat down with a sketchbook and came up with a way to use them.
First, I cut them all the same size with the lines going parallel to one right-angle edge. Then went to the local fabric store and found a complementary color for the background. From this, I cut pieces to join the bias edges, and strips to attach them to the rectangular pieces (also leftovers).

This picture is the leftovers up on the wall with the background pinned to it. The strip is actually 12 triangles, so about 52" long x 6" wide. I decided the quilt size - it will be narrower on the left, wider on the right. Next task is to cut those pieces, sew them, then get a backing/batting and put it on the machine. I'm going to use a modern, angular panto to quilt it. More photos soon!
P.S. Kali's Cherry Tree also got a "Viewers' Choice" - I am so blessed!!
Wednesday, June 17, 2015
A pleasant surprise!
The Edmonton & District Quilt Guild held their biannual show last weekend. Nearly 300 quilts were on display, in about 7 categories. They allow only one prize per person, consisting of a beautiful ribbon and money.
I entered four quilts: Kali's Cherry Tree, Horseplay, Layers, and Lord of the Rings. Here is the result:

Someone brought the judge over and introduced us. She told me that she remembered all four of my quilts and apart from the rule of only one prize person, she would have given me four ribbons. I thought she was just being nice until someone told me she would not say that without meaning it. Talk about a confidence booster!
Also, last week I finished "Modern Towers" and really like the results. It is quilted in vertical parallel rows using the channel locks on my Avante. They look like mini bicycle clips we used to use to keep our pant legs from getting caught in the chain! Slick tool. I don't know what to do with this one yet, maybe I'll put it on Etsy. Sea Foam went to Quilts of Valour on the weekend, but this one is too small. Those soldiers require bigger quilts to wrap themselves in.

Saturday, June 6, 2015
Finished - just about
The "Boys will be Boys" quilt has a label so it officially finished and soon on its way to a dear friend who has three of them, and one daughter.
The "Modern Towers" quilt has a few threads to hide, and the label to sew in place. I suppose it needs a sleeve, but I'm not sure. My daughter has been curling up on the sofa with it, so it is 'used' already!
Here are the labels... I changed the name on the boys quilt, just because!

I printed these on my ink jet using June Taylor Colorfast Fabric for Ink Jets. It is a bit still, but the package must get used up. This stuff is too expensive, so when I run out of the packages I bought, I'll go back to making my own with Bubble Set and white to-dye fabric with freezer paper ironed to it.
Tuesday, May 26, 2015
Graduation is over (May 15) and within a week I sandwiched and quilted this top started in February 2013, then put on the binding and a label. It is to go to a wounded soldier through the Canadian Quilts of Valor program.

The weather is so lovely now that I'm wanting to be outside, but the to-do list that piled up for the past 2 1/5 years is keeping me close to home. People keep asking "now what?" but I've not made any plans -- other than finishing some long neglected projects!

The weather is so lovely now that I'm wanting to be outside, but the to-do list that piled up for the past 2 1/5 years is keeping me close to home. People keep asking "now what?" but I've not made any plans -- other than finishing some long neglected projects!
Thursday, May 7, 2015
Sea foam and Snow
Now that my degree program is officially finished (graduation is May 15), I have more time to do some quilting. Here is a simple design made from my stash, now on the machine. The quilting will be done today. It is about 80" square and will likely go to Quilts of Valour. The quilting pattern is like ocean waves, so it is "Sea foam."

And this is what I woke up to yesterday morning. It snowed all day, but started to melt in the late afternoon, so now it is just very wet out there! We need the moisture. Today the sun is shining even though the temperature is chilly.


And this is what I woke up to yesterday morning. It snowed all day, but started to melt in the late afternoon, so now it is just very wet out there! We need the moisture. Today the sun is shining even though the temperature is chilly.

Monday, April 20, 2015
Nearly Done...
The Lord of the Rings quilt is getting its binding. I made a cute little foundation paper-pieced hen with chick. I also have my eye on a modern design with pieces and fabric on the design wall. However, I've two weeks left in my Master's degree (sweat, perspire, headaches, sore back, whine, whine) then graduation May 15. So, after cleaning up those places in my house that I've tried to hide for the last couple of years, I am going to quilt!
Photos later. I'm busy...
Photos later. I'm busy...
Monday, April 6, 2015
HQ Avante -- it works
Finally got this new quilt machine set up. It took my hubby and I three days of being able to work on it only during our spare time. However, I know now why the dealer wanted mega-bucks to come and do it for me.
BUT it is up, level, solid as can be, and I just had to try it... with something quick and easy. I dug into my piles of this and that and found a panel, loaded it using leader grips, and put the only panto I had that would be suitable (I have no kid-pantos) and did it, in a couple of hours or less. I think I am in love. Anyone looking for a longarm needs to check out this machine.

Sorry, the photo isn't the best -- it is hanging crooked and I'm always in a hurry. BUT in only needs a label and a binding to be finished. This is the quickest wall hanging ever. Now... onward to bigger and better things!
BUT it is up, level, solid as can be, and I just had to try it... with something quick and easy. I dug into my piles of this and that and found a panel, loaded it using leader grips, and put the only panto I had that would be suitable (I have no kid-pantos) and did it, in a couple of hours or less. I think I am in love. Anyone looking for a longarm needs to check out this machine.
Sorry, the photo isn't the best -- it is hanging crooked and I'm always in a hurry. BUT in only needs a label and a binding to be finished. This is the quickest wall hanging ever. Now... onward to bigger and better things!
Friday, March 20, 2015
I have reasons...
This is the picture I put on Kijiji...

Three days later, this is the way that corner looks...
I had five calls and three people wanting it...
got a good price and am happy, as was the buyer...

This is the other corner....

My hubby (and all-around handy person) is golfing in AZ
so I am quilting rug mugs on my DSM
and anxiously waiting for him to get home
and help me assemble the upgrade...
which is somewhat intimidating
as it came in eight heavy boxes...
he did open some as the contents were easier to move
from the front door to my studio without the boxes.
What a good guy!
Until this is assembled,
there will be not much action.
My dealer says, "Make more tops" --
but I have too many UFOs now!
Hopefully you will soon see a finished top!
Sunday, February 22, 2015
February Fun
This table runner is for a friend who lives nearby. It went together in a few days and is quilted with a simple in the ditch. She was delighted with it.
The next one is a group challenge. We were supposed to find a face and 'mess with it.' I've called this one "Layers" in reminder of the only book I've ever read that when finished the first time, I turned it over and read it again. It is Encouragement by Larry Crabb, and talks about the way we put up layers to keep people from seeing the real me. I love this little quilt and feel as if I've always owned it. Odd, but true.
 |
| for Margo |
The next one is a group challenge. We were supposed to find a face and 'mess with it.' I've called this one "Layers" in reminder of the only book I've ever read that when finished the first time, I turned it over and read it again. It is Encouragement by Larry Crabb, and talks about the way we put up layers to keep people from seeing the real me. I love this little quilt and feel as if I've always owned it. Odd, but true.
 |
| Layers |
Saturday, February 7, 2015
How cool is that?!
We are now home from a month in Arizona... where I had the neatest experience. I've made two quilts that were inspired by the art of Bob Coonts. By email, he gave me permission to do this. Since he lives in Colorado, we had never met.
Every January, the large art shows start in Scottsdale. We have gone to them a couple times and decided to go again. I took my daughter and her hubby with the intention of buying them a small art piece for their new home, and for her birthday (which I did).
We parked, got inside and paid at the desk and I turned around toward the first booth/display... it was Bob Coonts! I introduced myself and he remembered me. We talked for a long time. He is a very nice man and pleased that his work was inspiration for my work. I was so delighted to meet him. I would love one of his pieces, so am planning to give him a commission for a size/subject I can afford. The show lasts until the end of March, so if he works on site, who knows... maybe my hubby can pick it up on his annual golf trip.
Here are the two quilts inspired by his paintings. Bob's originals are on his website.
 |
| Paint Chip Pony |
 |
| Horseplay |
Wednesday, January 28, 2015
No more orphan blocks
From classes and experiments and such, I had about 30 orphan blocks (that I could find) so brought them with me on our holidays (and a sewing machine). While hubby was golfing, I sewed them pillowcase style into mug rugs. Some still need the opening for turning sewed up, and they all need a bit of quilting.
My daughter picked two already. She lives in a humid climate and loves them for soaking up the sweat from a cold glass on a hot day. I've a few ideas of where to send the rest. They are an odd batch though!

I also brought a small quilt to sew, but so far no progress. We are having too much fun. We leave for home in three days, so it will go back the way it came.
My daughter picked two already. She lives in a humid climate and loves them for soaking up the sweat from a cold glass on a hot day. I've a few ideas of where to send the rest. They are an odd batch though!
I also brought a small quilt to sew, but so far no progress. We are having too much fun. We leave for home in three days, so it will go back the way it came.
Subscribe to:
Posts (Atom)