Saturday, September 25, 2010
I'm still quilting
I've been working on three quilts. One is the giant Mariner's Sunset that covers our pool table. The second is a small "lick and stick" Christmas quilt with a zillion pieces and a stained glass look. The third is GD's Japanese Cherry tree... although I've been showing it off more than working on it --- which when translated means I'd not yet figured out how to quilt it! However, doing some sketching yesterday, I 've come up with a plan, so more sketching until I'm confident, and that one will go under the needle! No pictures today. Most of what I've done so far is not a significant change from what is below, except the Christmas quilt. Since it is taped to a table, I will wait until I can get it in a more photo-graphical position.

Friday, September 17, 2010
We have lift-off

She is thrilled, decided it should be a wall quilt, likely mounted on a studio canvas, and "I'll keep it forever." She agreed that her bed quilt could then have a kimono in the place she originally wanted the tree. She loved my selection of Japanese fabrics for it, and we are both happy.
The best part is this: she asked me to 1) make baby quilts in advance for the four kids she plans to have some day, and 2) make larger quilts in advance for them when they grow up. Don't you love the optimism! She made me feel at least ten years younger. Now I have to live long enough...
Btw, the picture is a pattern from Jukebox called "Shear Bliss." I have it, but haven't made it yet. After today, it might get pulled out of the drawer!
Monday, August 23, 2010
So excited...
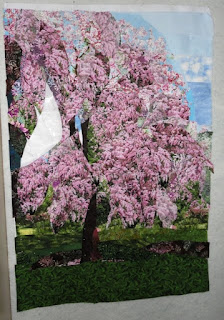
Today the tree is blooming --- finally, at least the piecing. Counting the week-long class I took to learn how to do this, plus time at home to get it done, fifty hours. This goes to my granddaughter. I'll tell her that she can repay me later, like push my wheelchair.

This one is all pieced, never counted the pieces but lots of them. No applique and a bit of hand-piecing to replace a few pieces that didn't look right when it was done. Changed them out for another fabric. (Oh, just noticed my flash put a funny glare in a couple of places. Ignore.)
The pattern and piecing were done using Ruth McDowell's method, which I like. Drawing the pattern was difficult, but selecting fabrics and fussy cutting them was worse. I'm very pleased with the results even though it took so long and was a big challenge. I suppose the bigger challenge now will be figuring out how to quilt it! I might be calling my instructor and yelling help -- again. LOL!

This is what I've done so far on the Christmas mini. Our church gets one that will be more than twice this size (it will be about 84" square). Mine is about 32" wide. So far all the little pieces are just stuck on with Steam-a-Seam II Lite, not even ironed. Now that the tree is finished (sort of), I can get back to this one... and the Mariner's Sunset monster spread over my pool table.

This one is all pieced, never counted the pieces but lots of them. No applique and a bit of hand-piecing to replace a few pieces that didn't look right when it was done. Changed them out for another fabric. (Oh, just noticed my flash put a funny glare in a couple of places. Ignore.)
The pattern and piecing were done using Ruth McDowell's method, which I like. Drawing the pattern was difficult, but selecting fabrics and fussy cutting them was worse. I'm very pleased with the results even though it took so long and was a big challenge. I suppose the bigger challenge now will be figuring out how to quilt it! I might be calling my instructor and yelling help -- again. LOL!

This is what I've done so far on the Christmas mini. Our church gets one that will be more than twice this size (it will be about 84" square). Mine is about 32" wide. So far all the little pieces are just stuck on with Steam-a-Seam II Lite, not even ironed. Now that the tree is finished (sort of), I can get back to this one... and the Mariner's Sunset monster spread over my pool table.
Sunday, August 15, 2010
Progress report day 6
The five-day class ended Friday. I did a bit of filing in on Saturday. This is still in pieces pinned to the wall. There are two copies of the pattern; one on the design wall, and one made of freezer paper that is cut up. Those pieces are pressed to the back of carefully selected fabrics (some need to be changed - not so carefully selected) and pinned to the pattern.
It still looks pretty messy, but the tree shows nicely. The second photo is a close up. I will be taking a few pieces off and dividing them so I can add something in the middle to break it up. (Like drooping branches going into the grass in the detail photo below, just to the right of center.)

This one has been a huge amount of work, but also tremendously satisfying. I didn't have a clue Monday how to draw it, Tuesday how to make the drawing into a pattern, Wednesday what it would even look like. But by Thursday the vision crept into the back of my head. Now I'm excited to sew it together... but first some rogue pieces need to be replaced, and I don't like the sky in the upper right. This will be 35" x 48" or thereabouts.

It still looks pretty messy, but the tree shows nicely. The second photo is a close up. I will be taking a few pieces off and dividing them so I can add something in the middle to break it up. (Like drooping branches going into the grass in the detail photo below, just to the right of center.)

This one has been a huge amount of work, but also tremendously satisfying. I didn't have a clue Monday how to draw it, Tuesday how to make the drawing into a pattern, Wednesday what it would even look like. But by Thursday the vision crept into the back of my head. Now I'm excited to sew it together... but first some rogue pieces need to be replaced, and I don't like the sky in the upper right. This will be 35" x 48" or thereabouts.
Thursday, August 12, 2010
Progress report
This picture is the progress on the Christmas quilt, my smaller version. The one my group will do for the church is 84" wide. This one is about 35" wide. It is on hold this week while I am in classes.

This next picture might look like a dog's breakfast. It is the progress after four days in the class taught by Margo Fiddes using the Ruth McDowell method for creating a design, a pattern and then the quilt. (See previous post.)

This has been challenging. I am a detail person and this requires thinking big picture first then working toward detail. The process goes something like this:
1. Select a picture and draw it at least 11" x 17"
2. Divide it into logical sections
3. Enlarge it to the desired size. In my case, it is 35" x 48"
4. Trace the drawing to the shiny side of freezer paper.
5. Put registration marks and ID numbers, etc. on the dull side so the pieces can be sewn together.
6. Select fabric for each section and piece.
7. Cut apart the sections, one by one.
8. Press each freezer paper pattern piece to the wrong side of the fabric selected for that piece.
9. Pin the fabric/paper section just created to its place on the enlarged drawing.
10. Repeat 6-9 when you goof up, as often as necessary.
11. When all is done, sew it together, section by section.
As you can see, I've several more sections that need fabric ironed on to the freezer paper patterns. Those are the white parts. Also, look at the bottom: some parts of the foreground grass have fabrics rolled up and pinned there. This is part of the selection process. I've left them there so I don't forget my choices.
Also, when I ironed fabric to some sections, it didn't work. Repeat 6-9. OR, it needed a softer edge, so had to make one piece into two, OR it needed a bit of another color, so had to add another section.
I'm excited today, finally. In the beginning, I had no clue what I was doing and no vision of what this should look like. Today, I can now envision what the final quilt will look like. Stress and many decisions. This is why quilters who do work like this earn the big bucks when they sell their pieces!

This next picture might look like a dog's breakfast. It is the progress after four days in the class taught by Margo Fiddes using the Ruth McDowell method for creating a design, a pattern and then the quilt. (See previous post.)

This has been challenging. I am a detail person and this requires thinking big picture first then working toward detail. The process goes something like this:
1. Select a picture and draw it at least 11" x 17"
2. Divide it into logical sections
3. Enlarge it to the desired size. In my case, it is 35" x 48"
4. Trace the drawing to the shiny side of freezer paper.
5. Put registration marks and ID numbers, etc. on the dull side so the pieces can be sewn together.
6. Select fabric for each section and piece.
7. Cut apart the sections, one by one.
8. Press each freezer paper pattern piece to the wrong side of the fabric selected for that piece.
9. Pin the fabric/paper section just created to its place on the enlarged drawing.
10. Repeat 6-9 when you goof up, as often as necessary.
11. When all is done, sew it together, section by section.
As you can see, I've several more sections that need fabric ironed on to the freezer paper patterns. Those are the white parts. Also, look at the bottom: some parts of the foreground grass have fabrics rolled up and pinned there. This is part of the selection process. I've left them there so I don't forget my choices.
Also, when I ironed fabric to some sections, it didn't work. Repeat 6-9. OR, it needed a softer edge, so had to make one piece into two, OR it needed a bit of another color, so had to add another section.
I'm excited today, finally. In the beginning, I had no clue what I was doing and no vision of what this should look like. Today, I can now envision what the final quilt will look like. Stress and many decisions. This is why quilters who do work like this earn the big bucks when they sell their pieces!
Monday, August 9, 2010
Design classes

There are only four of us in the class. Two are doing floral designs. The third is doing a person, and mine is a Japanese Cherry tree, modified photo on the left. Drawing a pattern is more difficult that I'd anticipated. I'd taken classes on constructing McDowell's straight-line piecing and curved piecing, and loved them, but designing your own pattern is different and very challenging. Now that I've had a little bit of instruction, I wish I were doing cherry blossoms. They would be easier! My GD wants a tree though, so by the end of the week I'll know if she gets one. Right now I'm thinking that it isn't going to happen!
Friday, July 30, 2010
And the winner is...
My neighbor picked a random number and the winner of the 200 post giveaway is "Momhooten" - whose email address I cannot find. I did a bit of detective work and think that this name belongs to Debi Hooten. Debi, please contact me (my email is on my blogger profile, click link on the right) and let me know your mailing address. I have a prize for you.
On another note, remember the big Christmas quilt in the works for my church? Well it is so pretty that I decided to make a smaller version for myself. This is a diversion from the Mariner's Sunset that sometimes (aka most of the time) makes me feel overwhelmed. Here is the progress so far on the little Christmas quilt... it is about 36" wide.

Above is the full-size pattern pinned to rich blackish fabric.

These are a few sky pieces (top left corner) that I put down last night using Steam a Seam 2 Lite. Tracing them took longer than putting them in place. This batik is lovely. I'm going to put some jewel "stars" in a few spots later. This is too much fun!
On another note, remember the big Christmas quilt in the works for my church? Well it is so pretty that I decided to make a smaller version for myself. This is a diversion from the Mariner's Sunset that sometimes (aka most of the time) makes me feel overwhelmed. Here is the progress so far on the little Christmas quilt... it is about 36" wide.

Above is the full-size pattern pinned to rich blackish fabric.

These are a few sky pieces (top left corner) that I put down last night using Steam a Seam 2 Lite. Tracing them took longer than putting them in place. This batik is lovely. I'm going to put some jewel "stars" in a few spots later. This is too much fun!
Subscribe to:
Posts (Atom)